Drawing a dirt bike:
You can do many fun outdoor activities, but few are as exciting and thrilling as mountain biking! Few activities can induce an adrenaline rush, like riding a mountain bike, and they come in many different variations and designs. As much fun as they are to ride, learning how to draw a dirt bike can also be great fun! By the end of this guide, you will know how to draw one of these fantastic vehicles.
You can draw more drawing ideas like bud drawings, cartoon graphics, 3D sketches, bird drawings, terrain drawings, animal illustrations, and many more. We hope this step-by-step guide to drawing a dirt bike makes learning to ride a little easier.
How to draw a dirt bike – let’s get started!
Step 1
This first step of how to draw a dirt bike guide may seem complicated, but once it’s done, the following steps will be much easier. You can draw a rough outline for the bike and rider using the pencil and the reference image. This is a step that you should do slowly and try to make it look as close to the reference image as possible. Once you’ve drawn the rough outlines, you can use your pencil to start adding details to the helmet and arms of your outfit.
Step 2
In this part of your dirt bike drawing, you’ll add more pen lines and fine detail to the image. You can add the details above for this part and start at the bike’s handlebars. If you go slowly, follow the reference image and use your pencil marks, you shouldn’t have a problem with that!
Step 3
This third step of our guide to drawing a mountain bike allows you to extend the pencil lines on the bike even further. In this step, there are a few sections that we will focus on. This includes the rider’s pants, as shown in the reference image. Next, we will work on lengthening the mountain bike’s front parts, including the bike’s front tire. There are many small details, but the reference picture will help you a lot when drawing!
Step 4
Then for your dirt bike drawing, you can finish the rider by drawing his boots. When you have finished the pilot, you can also draw some details for the back part of the dirt bike. That leaves just a few final details we’ll add in the next step.
Step 5
It will soon be time to draw the final details, but before we get to that part, there are just a few final details to add to this step of our guide to drawing a dirt bike. First, you can draw the bike’s rear tire to complete the main structure. Once you’ve drawn this tire, you can erase the pencil lines from step one. You must be careful when you start erasing the pencil lines because if the ink is still wet in pen, you can smudge it.
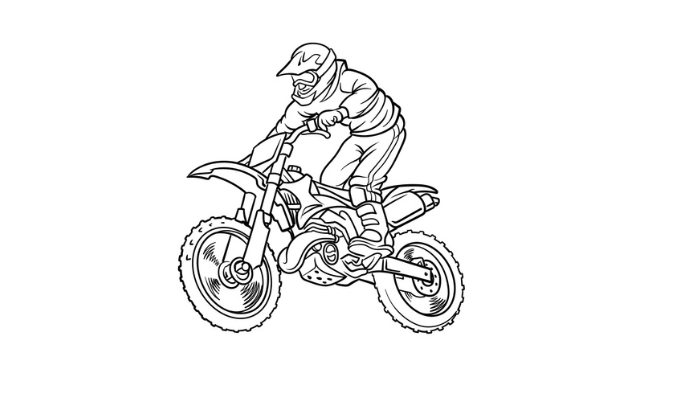
Once the pencil is completely erased, you can draw some final details on the drawing. These go through the bike and the rider, and you can use as much or as little detail as you like in our example! Before the final step, add any details and extra elements you want! If you feel creative, you can draw a background for this picture. It would be a great way to show where you would like to ride this dirt bike if you were that rider.
Step 6
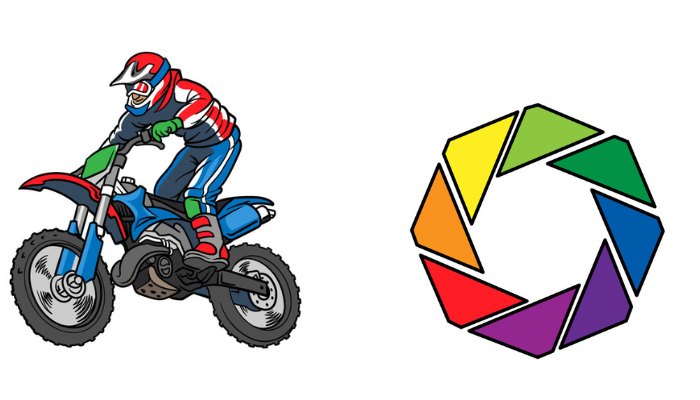
In this part of your dirt bike drawing, you can take your favourite colours and use them to complete your drawing! We used blue, red, and green along with darker shades of grey for our reference image, but that’s just one way to approach this image. Dirt bikes can come in all colours and designs, giving you freedom regarding colour schemes.
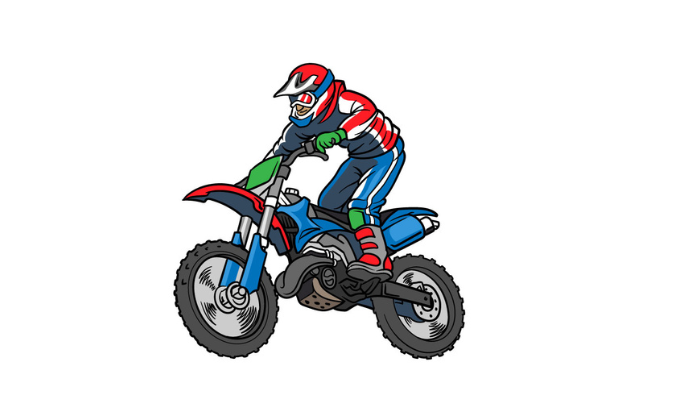
Using bright, vibrant colours or more muted tones will look fantastic! This image has many intricate parts, so using media that allows for precision will make colouring much easier for you. These can be coloured pencils, markers or fine-tipped brushes.
Draw An Octagon
You can find many types of shapes, and they are all characterized by the size and number of edges they have. We see specific shapes like squares, rectangles and circles daily, but some are much more unusual.
For example, the octagon with its eight sides is not often seen. Because it’s not widely known, learning how to draw an octagon can be tricky! Luckily, if you want to learn how to do it, you’ve come to the right guide. However, with the help of this step-by-step guide to drawing an octagon, you’ll find out just how easy it can be!
How to draw an octagon? lets begin!
Step 1
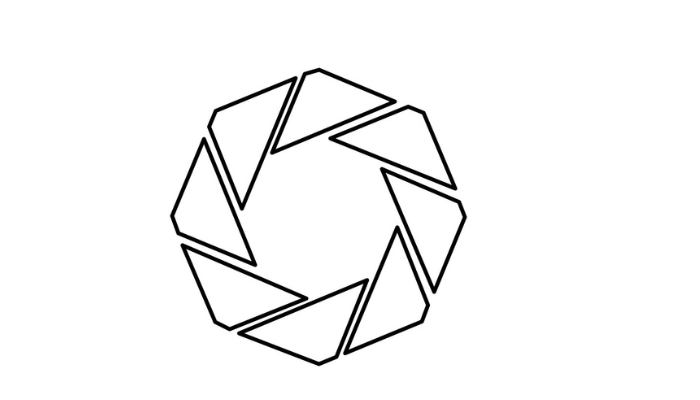
For this tutorial on how to draw an octagon, you will need a ruler and a bit of patience! Instead of drawing a simple octagonal shape, we’ll construct it from several smaller triangular shapes. For this reason, you are having a ruler handy for this guide will make your life much easier. You’ll draw the first two of these eight smaller shapes to start this first step.
Positioning all those triangular shapes can be challenging, so you can use a pencil first, then go over it with a pen once you’re happy with how it looks. If you have trouble with this, you can also use a tool like a protractor to draw triangles of equal size each time. Also, the top tip of each triangle should be trimmed to leave a slightly flat edge at the top. It may not look obvious, but the reference image will show you what it should look like!
Step 2
In the second part of your octagonal design, add two more of the triangle shapes you added in the previous step. We mentioned that this drawing would require patience, and you will understand why in this step! The hardest part of this whole drawing is positioning the triangles correctly, so remember you can always use a pencil for now!
Step 3
Master it with this guide to drawing an octagon! For this third step, continue what you started in the previous two steps and add two more triangles to the shape. The reference image will help you position the following two triangles. That’s it for this step, and you can move on!
Step 4
You probably know what’s next for your octagon design! In this step, we will continue to build above the shape by adding another triangle. This step differs from the previous ones because instead of two triangles, we will add one. This one will go in the top of the space on the left side of the octagon. This will leave a small gap, but we’ll take care of that in the next step!
Step 5
We mentioned one last gap in the previous step of how to draw an octagon guide, and we’ll take care of it now! All you have to do is draw one final triangular shape to fill that gap. With that last triangle added, you’ve completed your octagon! However, before moving on to the final step, there are a few things you can do to add your touch to this image. You can draw a few more lines between the triangles if you want to make it one big shape instead of eight separate lines.
You can add more lines and shapes to create a vast collection of shapes and patterns! Maybe you could incorporate that octagonal shape into a cool logo or draw texture markers. This second idea might help make the octagon shapes look like they are made of wood or some other material. These are just a few ideas, so get creative and see what you can think!
Step 6
This brings you to the end of your octagon drawing! Now that you’ve added all the forms, lines, additional details and components you want, it’s time to complete it with some excellent colours. Our reference image used a different light colour for each shape. However, this is only one way to colour your image, so this is a step where you can let your creativity run free!

You can also use different artistic tools and mediums to bring colours to life. You can use paints, pencils or markers depending on the colours you want for your image.
Learn More : draw an octagon And dirt bike